Posts

Showing posts from April, 2019

How to create a Hyper-V virtual machine

Image
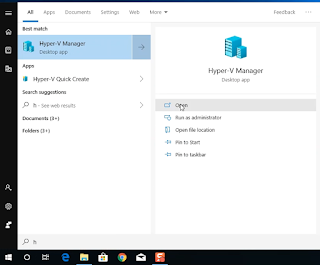
After you enable the Hyper-V on your test machine, you can now create virtual machine. If your Hyper-V is not yet enable, please visit my post here -   How to Enable Hyper-V . To create virtual machine, follow the steps below: Open Hyper-V Manager Right-click on the machine, then Select “New”, then select “Virtual Machine”. A “New Virtual machine wizard” window will show. On the new virtual machine wizard, click “ Next ” On the Specify Name and Location:  Name:  VM Name On Location, check the “Store the virtual machine in a different location” Location:  VM Storage By not checking the “Store the virtual machine in a different location” the VM will be stored on a Default storage.     Then, click “ Next ” On the Specify Generation, choose which type of machine you want to create, then click “ Next ” On the Assign Memory: Input  4026  and  uncheck  “ Use Dynamic Memory for this Virtual Machine ”, then click “ Next ” On the Configure Network

How to connect your Hyper-V VM to internet

Image
Hyper-V uses virtual switch, for your VM to communicate to each other, for your VM to communicate to the host and for your VM to be able to access your internet, if you need too. Hyper-V has 3 categories on virtual switch, Internal , Private and External virtual switch.             External virtual switch – is the virtual switch that connect to the physical network.            Internal virtual switch – is use to connect all your VM to communicate to each other and to communicate to host.            Private virtual switch – is used to connect all your VM to communicate to each other, but cannot communicate to the host. For your VM to connect to the internet, you must create an external virtual switch. In creating your virtual switch, you should know, which type of physical network your host has internet connectivity. Are you using wired connection or wireless connection? To create external virtual switch: Open Hyper-V, then on the host PC, right-cli

How to Install Windows Server on Virtual Machine

Image
After you have created a virtual machine on your test PC, you can install Windows Operating System - Server or Workstation. Make sure that you have the .ISO file for installation. You can download Evaluation version of Microsoft applications  here! To create a VM on Hyper-V, click on this link - Create Hyper-V VM . Installing Windows Server on the VM. To install the Windows Server 2019 Evaluation. Make sure the the .ISO image is already mounted on your VM to start. Right-click on the VM, then click “ Connect ” The VM windows will open, then click “ Start " Once the VM starts, it will automatically load Windows Server 2019 and starts the installation. Windows Setup will start, click “ Next ”, then click “ Install ” Select an operating system you want to install, then click “ Next ” Choose “Desktop Experience” to install the Windows Server GUI version. Accept the License Terms, then click “ Next ”  Choose, which type of installati

How to enable Hyper-V on Window 10 Machines

Image
If you are trying to create a test environment, you can now use Windows 10 OS to enable Hyper-V and create test VM. Hyper-V can be enabled on these versions of Windows 10: Windows 10 Enterprise Windows 10 Pro Windows 10 Education And hardware requirements are: 64-bit Processor with Second Level Address Translation (SLAT). CPU support for VM Monitor Mode Extension (VT-c on Intel CPU's). Minimum of 4 GB memory. As virtual machines share memory with the Hyper-V host, you will need to provide enough memory to handle the expected virtual workload. For more details about Hyper V requirement you can check it here: MS Hyper-V Requirements Enable the Hyper-V on your machine: Go to Control Panel à Programs à On the Program and Features, click “Turn Windows features on or off” On the “Turn Windows features on or off” windows à Check  Hyper-V and then click “OK” It will automatically apply the changes and wait for it to finish. Yo